

A little photo advice: proximity
To make a portrait, you have to get as close as possible to the person. The same goes for a product presentation that holds up. And to showcase an animal, the same principle applies. Why should you do this?
In photography, there are some golden rules. They are not absolute and always correct, but will help you if you are just starting out in this field. As a neophyte, photographic composition is far from self-evident.
How do you go about depth of field? How do you get an image that renders a certain softness and sharpness? Something like the one above? Let's take a closer look!
As a general rule, a photo is based on three elements:
- the foreground;
- the background;
- the background;
Here's what it looks like in practice.
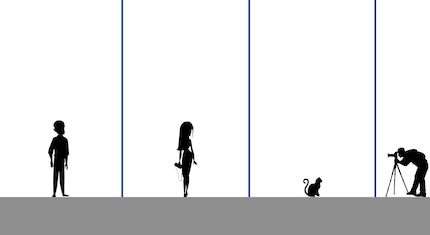
A proper photograph taken by a beginner should revolve around these three shots.
The three planes in practice
The foreground is about a metre away from you.
- Stand one metre away from the foreground so that it is in focus.
- Stand one metre away from the foreground so that the background is in focus.
- Stand one metre away from the foreground so that the background is sharp.
The ring on the lens allows you to control the image sharpness setting.
The zoom
Normally, your lens has a zoom function. It helps with the final composition of the photo or to capture any object that may be startled or physically inaccessible. That said, wherever possible you should aim to get as close as possible to the subject being photographed, as this technique lends a more beautiful depth to the image.
Livia, my model, appears clearly in the image - the photo having been taken up close -, Luca, in the background, does not.

Here's the camera angle:
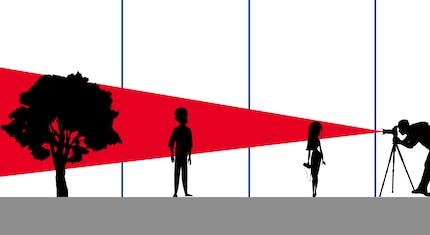
If I zoom in as far as I can, but keep a distance from both subjects, the framing of the photo is similar, but I lose all depth. The geometry changes. Whereas Luca appears to be a long way behind Livia in the top photo, in this one he gives the impression of being practically next to her, which adds depth.

That's what it should look like in theory.
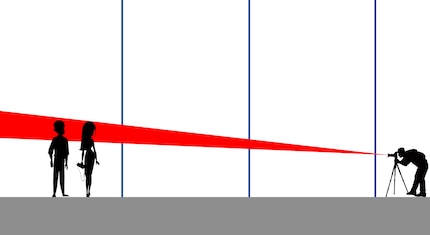
The reason? In the second photo, I only photographed the background. The foreground and background go completely by the wayside and the depth of field information in the image is lost.
Here's the trick to getting depth in a photo. On your cameras!
The photos in this article were taken with this equipment:
Journalist. Author. Hacker. A storyteller searching for boundaries, secrets and taboos – putting the world to paper. Not because I can but because I can’t not.
Practical solutions for everyday problems with technology, household hacks and much more.
Show all